
Convert new romanian leu to rubles online romanian money
The new Romanian lei is the national currency of Romania, introduced on July 1, 2005 by exchanging old lei for new ...
It is always better to start sewing with the simplest project. The sun skirt is exactly the option that can be advised for beginners. It fits any shape and can be made from almost any fabric. The calculations for the pattern are based on just a few measurements. Even a novice craftswoman will be able to sew a beautiful and fashionable thing with her own hands.
Sun skirts are of 4 types:
This picture will help you figure it out.
Depending on the length, skirts can be divided into three groups: mini, midi, maxi.
For an average height (about 170 cm):
In my step by step instructions will be considered by sewing a regular skirt sun ( full sun) mini size ( or midi if for a girl).
To build a pattern for such a skirt, you need only two measurements: the waist circumference and the length of the product. In fact, you need to carve out a circle from the fabric, which will contain another circle - the belt. The main task is to correctly calculate their radii. The pattern (or rather half of it) will be built on paper folded in half.
Measure around your waist and add at least 1.5 cm to it for a free fit. Often, such an allowance is made already during the measurement, and the waist circumference is recorded with it. Thus, we get the size FROM(waist circumference).
Next, we recall the geometry course and make the necessary calculations. The circumference is equal to the product of the number π and two radii ( c = 2R x 3.14). Therefore, in order to calculate the radius of the circle, it is necessary to make the following calculations: divide the circumference (waist circumference) by 2 π (2 × 3.14 = 6.28), i.e.:
We set aside the segments AA1 and AA2, equal to the calculated radius.
We build an angle of 90 degrees, the vertex of this angle is point A. It is necessary to set aside along the segment on the sides of the angle equal to the radius of the circle (belt).
We use the ruler as a compass (if in doubt about its accuracy, take a real one) and draw a dotted circle line with the same radius on the pattern canvas.
The next measurement is the length of the skirt itself (DU)... We put aside the segments A1H1 and A2H2 on the sides of the corner. Then we build a new circle. It is better to set its radius from point A (after all, inaccuracies in the construction of the first circle will also be reflected on the lower edge). The radius of this circle will be equal to the sum of the segments AA1 and A1H1.
Your builds gave half of the front pattern. We cut it out, getting a pattern for half of the skirt by folding the paper. Allowances can be marked in advance for the top and bottom edges, or they can be applied to the fabric when cutting.
At this stage, it is very useful to attach a paper pattern to the figure and correct possible flaws (and a beginner master should practice by cutting out the entire skirt on paper).
Additionally, we cut out a rectangle that will become a belt. Its length will be equal to the waist circumference + seam allowances, and the width should be twice the desired width + seam allowances.
Bend the fabric in half across the warp threads. Cutting should be by placing a pattern with a diameter on the fold line and securing with pins. If you did not create hem and waist allowances on the pattern, you can apply them directly to the fabric, setting aside the desired distance from the paper.
The length of the allowances will depend on the type of seam selected for processing. It is better to make the allowances a little larger so that it is possible to correct the final details in case of inaccurate measurements.
Now you should cut out the skirt, grabbing the entire fabric with scissors. As a result, you will get the required circle. We cut it along the fold line of the fabric on one side: in this place the zipper will be sewn in.
The next step in building a pattern is trying it on. A mannequin will help you a lot. Place the future skirt on it and let it hang down. Since the skirt is cut obliquely, the warp and weft of the fabric may warp slightly.
 The skirt should hang down
 After the skirt hangs down, if necessary, trim the bottom line of the skirt with sharp scissors, attaching a paper pattern to it.
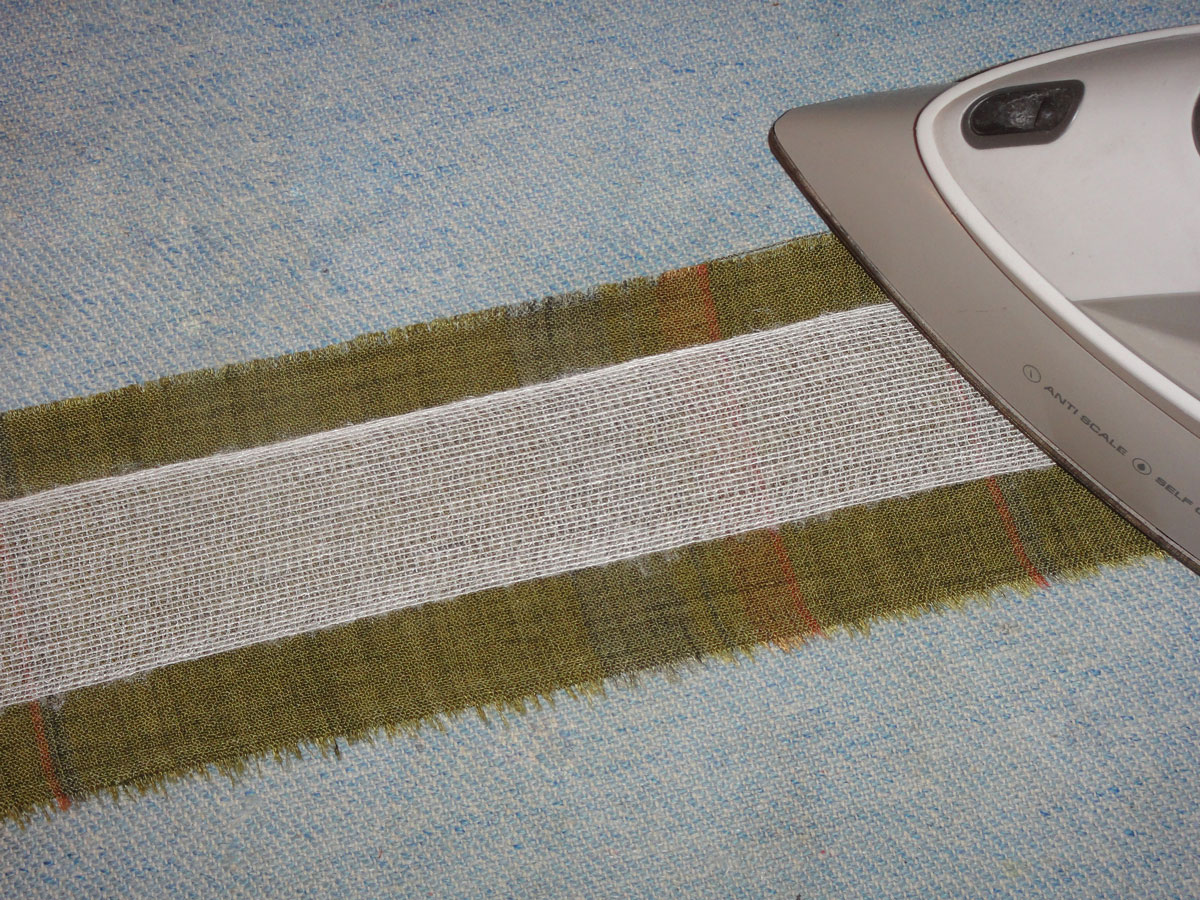
It is better to start work with sewing a belt.
Connect the belt and lining part and fold the allowances on the two long sides of the belt to the wrong side, securing the folds with an iron. Fold the belt along the right side inward and secure the fold with pins.
Sew the edges on both sides with a typewriter, then turn the belt out to the right side.
Hem down the hem of the skirt using a seam that matches your fabric. You can, for example, overlock the hem of the skirt or fold the fabric up twice.
The sun skirt is a popular model that will add femininity and sophistication to the image. Sewing such a skirt with your own hands is not difficult at all if you use examples of ready-made patterns and step-by-step recommendations.
The choice of materials for the sun skirt is very wide. Most often they sew from cambric, chiffon and satin. The style is considered universal for any season. Thin knitwear is perfect for spring and summer, woolen fabrics for cold weather.
One of the most advantageous options is heavy silk. The silk skirt falls in smooth waves and beautifully emphasizes the figure, makes the waistline even thinner.
There are also no restrictions on the selection of colors. The model goes well with a variety of ornate patterns, geometric shapes and trendy prints.
Among the popular models, there are both single-layer and multi-layer skirts. In the case of using several layers when sewing, the upper material should be chosen light and thin, and the bottom should be made of coarse fabrics that keep their shape well. This combination allows you to create images for important events and activities.
The latest trends use multi-colored layers of different lengths, stylish flounces and ruffles.
Correctly taken measurements will help to sew a product that fits perfectly to your figure.
To do this, you need to follow a few simple rules:

Before starting work, you should prepare everything that may be needed during sewing.
Skirt sun (do-it-yourself pattern will be described step by step below) and a list of required inventory:

When the workplace is ready and equipped with everything you need, you can start preparing the fabric to start creating a pattern:
Skirt sun (do-it-yourself pattern step by step):

The pattern for the belt of the sun skirt must be properly processed.
To do it yourself, you need an iron and step-by-step recommendations:

The zip closure makes it easy to put on and take off the skirt.
To sew in a zipper, you need to follow a few simple steps:

The peculiarity of the cut of the skirts of the sun is that areas of uneven hem edges are always formed at the moment when all the details of the product have already been connected with seams.
It is most convenient to trim the bottom of the skirt with help. Description of one of the ways:

There are several options for finishing the bottom of flared skirts. The most common ways are:

Scheme with a visual demonstration of the method:
It should turn out as shown in the diagram: 
To sew a long skirt, you will need 3 measurements: waist, hips and product length.
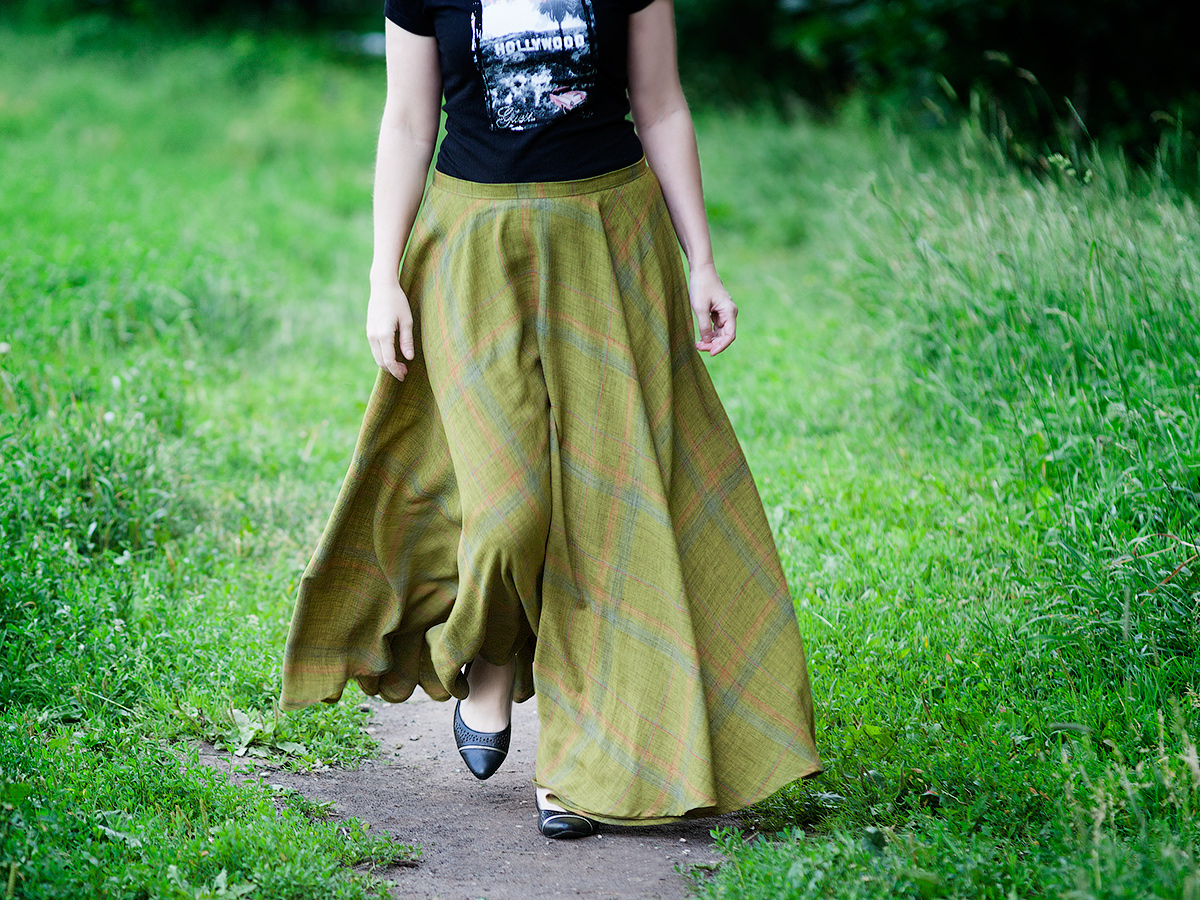
Skirt sun (do-it-yourself pattern step by step and a description of the cutting and sewing process) to the floor:
Photo with an example of skirts to the floor: 
It is very easy to cut out a fluffy skirt of the sun from tulle on your own.
Description of one of the ways to create a layered skirt:
Examples of tulle skirts in the photo: 
A skirt sun with an elastic band is the easiest option, which even a beginner can handle sewing.
Skirt sun (do-it-yourself pattern step by step and a small instruction for sewing) on an elastic band:
Examples of stylish leather skirts sun with a belt and elastic: 
Short instructions for sewing a skirt with a sun zipper:
Step-by-step instructions help you create patterns for different models of the sun skirt. You don't have to be a professional to sew a skirt of this style with your own hands.
All the necessary information from the calculation of the fabric to the processing of the finished product is available with a detailed description.
Article formatting: Mila Friedan
How to sew a skirt - sun:
Double sun skirt:
A skirt is always beautiful and feminine, and a sun skirt is a thousandfold femininity. Sewing the latter is very simple, and wearing the fruits of your creativity is many times more pleasant than a purchased item. Today's article is a detailed, step-by-step master class with photos. After reading it, you can sew a wonderful skirt in just a couple of hours of free time.
The choice of fabric is one of the fundamental success factors in sewing a product. Even if you have correctly identified the style of the outfit that suits your body type, color scheme, but at the same time bought the fabric of the wrong structure, texture and quality, the result will disappoint you. In other matters, most of the material is suitable for a skirt, you just need to know what kind of product you want to get. The most optimal option is a fabric of medium hardness and the same degree of drape. Gabardine is perfect for this description. This is a very high quality fabric that does not shrink when washing and is wear-resistant. Garments sewn from gabardine retain their original appearance for a very long time, they are easy to iron and slightly wrinkled.
In ours it is sewn in 42 sizes (waist circumference 64 cm). The fabric consumption is based on the length just above the knee (45 cm from the waist). If you are planning a skirt longer or, conversely, shorter, then you will need more or less fabrics, respectively.
So, for work you will need the following materials:
Before starting work, be sure to iron the fabric. Firstly, the material will shrink slightly, and secondly, it will be much more pleasant to work with the fabric.

The pattern of the sun skirt is so simple that it can be done immediately on the fabric, without translation from paper.
Fold the ironed fabric in half. To prevent the material from "running" during the construction of the pattern and cutting out the parts, carefully pin off the fold with needles.

Then measure and mark the middle of the fold of the fabric with contrasting chalk.

Next, you need to calculate the radius. In order not to build complex schemes, just divide the waist circumference (+ 0.5 cm) by 6.28. For example, if the waist circumference is 65 cm, then the radius will be: 65.5 / 6.28 = 10.4 cm. Attention, if you plan to sew a skirt-sun with an elastic band, then calculate the radius by the girth of the hips, otherwise you simply will not be able to put it on.
From the marked center, measure the resulting radius to the right, left and down at a right angle. Then connect the three dots to create a semicircle like this. To keep the figure straight, use the centimeter as a compass.
 Now you should postpone the length of the skirt. From the edges of the drawn semicircle, measure the desired length of the skirt with a ruler. And draw another semicircle.
 Draw a straight line in the center of the skirt - this is the future seam where the lock will fit.
 That's all, the pattern of the skirt is ready, you can start cutting it. You will get such an element.
 Cut the skirt along the seam you marked earlier. If the skirt was sewn with an elastic band and the radius was calculated according to the circumference of the hips, then there will be no seam.
Now be sure to try it on. Wrap a skirt around your waist and check that everything fits well. If the waist circumference of the skirt turned out to be much larger, excess fabric should be removed. To do this, determine exactly how much you have to cut, then divide by 2 and measure the difference from the two edges of the skirt - cut. Attention, never cut off all the difference on one side, then the edges of the skirt will not come together and you will simply ruin the material.Remember that you must always have seam allowances. It is 1 cm along the waistline, 2 cm along the side seam, and 0.5 cm along the hem (for a sun skirt).
Overlock or machine the edges of the skirt: hem and side seams. Leave the waistline intact.

Then "walk" along the edge of the skirt with a bias tape.

Despite the fact that the edges of the skirt will be almost invisible, still carefully consider the process of edging. If you do not have a special foot, then it is better to baste the tape before sewing it on.

The next couple of paragraphs will focus on the decorative element of the skirt, which is made at will. If you want to leave only a slanting inlay at the bottom, then just skip the article below.
Cut strips from a soft mesh, about 2-3 cm wide. This is a future decorative assembly. The number of stripes depends on the width of the bottom of the skirt. For reference: the width of the skirt in the photo is a little more than 3.6 m, 11 such strips were used to decorate it.

Sew the strips together, making them one long ribbon. Then set a stitch of at least 3 mm on the machine, loosen the thread tension and lay the stitch along the tape, one centimeter from the edge. Then, with your hands, gather the strip, forming ruffles. For these purposes, you can purchase a special foot (pictured), which will immediately make a decorative element from any fabric.

You will get such nice ruffles.

Fold the ruffle to the seamy side of the skirt so that the wavy mesh peeps out from the front, but the seam is not visible.

Stitch them on a typewriter. It is advisable to sew the ruffle along the same line as the bias tape, or so that the new line runs parallel to the previous one. Don't worry if you can't make the ruffles even, as soon as you sew them to the skirt, just trim it with scissors and that's it.

Now fold and iron the back seam allowances.

Baste the fastener and sew it on using the special slip-fastener foot.

Close the back seam.

The hidden lock from the front must not be visible.

Press back seam from wrong side.

Now we start sewing the belt. To do this, cut a rectangle out of the fabric. Its length should be 5 cm greater than your waist circumference (of which 3 cm for the entry and 2 cm for processing). The width is equal to twice the width of the desired belt + 2 cm for processing. Those. if you want to make a belt of 5 cm, then the width of the workpiece will be 12 cm (5 x 2 + 2 cm). Cut a similar rectangle out of dublenine (you can use non-woven fabric, it's cheaper). Attach the dublerin glue base to the wrong side of the belt and glue it with an iron. Then work one side of the belt on the overlock.

Mark the allowances left earlier. The button will be located on the right side, so we leave there 4 cm, and 1 cm on the left side, there will be a loop. Mark the lines, taking into account the fact that the belt will be sewn to the skirt with the raw side.

Use needles to baste the belt to the skirt, leaving the marked ends free.

 Sew the raw side of the waistband to the skirt, 1 cm from the hem.
 Before proceeding with sewing, be sure to make sure that the back seams of the waistband fit together. All irregularities will be noticeable when worn, which looks ugly.
 Turn the left side of the belt as shown in the photo and fix the corner with a needle.
 Sew on a typewriter 1 cm from the edge. This centimeter was just left for processing.
 Then carefully, at a distance of a couple of millimeters, cut off the allowance.
 Turn the corner of the belt right out. Adjust the corners by prying in the seam allowances from the wrong side. You should get such a flat corner.
Do the same on the other side. Start sewing from the top, decrease the stitch length in the middle and sew the corner of the waistband, then lengthen the stitch and sew to the end. Turn right out and straighten all corners as well.
 Fold in the waistband until it takes its final shape. Iron it and the seam that connects the belt to the skirt from the right side.
 Pin the belt so that it lies still on the skirt. From the "face" of the product, lay the line straight into the seam shown in the photo. Working on a typewriter, slightly push the skirt apart with your hands so that you can clearly see where to hit with the needle.

The threads that remain after sewing must be hidden so that there are no knots. To do this, make 2-3 knots, tighten well, then thread both threads into one needle and insert the last into the belt, and after 2-3 cm. Cut the tail that comes out. 

We make a loop on the left side. It is located 0.5 cm from the edge, exactly in the center. Mark the beginning, attach the button and circle it (beginning and end of the button). This will be the size of the loop. Make the latter with the special foot.
 Open the loop with a ripper. This should be done from the edges to the center. Cut very carefully so as not to damage the threads.
 Now you need to determine where you need to sew the button. To do this, connect the belt and pierce the very edge of the loop with a needle. Then remove the loop and sew on the button, stepping back from the puncture site of millimeter 3.
 After sewing on the button, check if it fits well and how easily it fits into the buttonhole.
 The final step is to iron the product, paying particular attention to the seams.
That's all, the sun skirt is ready! Now the best part is the fitting.


To build a pattern for a skirt, the sun needs only 2 measurements - the waist circumference and the length of the product.
Waist circumference 68 cm.When constructing a pattern for a half-sun skirt and a quarter-sun skirt, I told you that a pattern can be built without complicated calculations, when constructing a sun pattern, one could also not count, but it is better to do the calculations anyway.
In order to find the radius of our circle, it is necessary to divide the obtained number of the waist circumference by the number 2pi, i.e. 68: (2 * 3.14) = 68: 6.28 = 10.8 cm This formula calculates the radius of the circle for any figure , the main thing is to measure correctly the waist circumference. In order to show you, by example, how to build a pattern of a sun skirt of greater length than in previous versions, take the length of the product equal to 80 cm.
After we measured the waist (68 cm) and determined the radius of the waist circumference 68 using the formula: (2 * 3.14) = 68: 6.28 = 10.8 cm, which in our case is 10.8 cm, this figure is rounded to a whole number of 11 cm, since when working with chalk, these 2 mm will still be lost.
So, from the edge of the fabric we set aside the length of the skirt and put a mark (80 cm), from this point we set aside the length of the radius, i.e. 11 cm this point will be the center point of the circle. Be careful, after we have identified the center point of the circle on the fabric, we fold the fabric twice! If the fabric is cotton, you can lay the fabric on top of each other, but there are thin and very slippery fabrics that cannot be stacked on top of each other, and then each panel must be cut out one at a time. 

Set aside 11 cm from the corner of the fabric and put a mark  draw an arc of the waist circumference

waistline
Set aside 11 cm from the corner of the fabric and put a mark. On which we will then draw an arc - the line of the circumference of the waist.
The more often you mark, the easier it will be for you to build a line around your waist later. Since the fabric is folded twice and when we cut along this line, we immediately get half of the 68 cm of the waist. To determine the line of the length of the skirt, we align the mark of 80 cm along the waistline, and just as we put off the radius of 11 cm, mark the 80 cm. All the time you need to put marks with ray movements. 


In order to make it clearer for you, I work with a marker, of course, you can work with a marker on your fabric, but only if it is specially designed for this, if it is self-disappearing and is designed to work on fabric.
Here we cut off our circle with an ideal radius of 11 cm. Now we cut out a radius of 80 cm in the same way. The advantage of cotton over other fabrics for sewing a skirt of the sun is that you can cut the second panel according to the first one.


For thin fabrics, it is better to repeat the whole process and not risk it, since the perfect cut may not work out.
To do this, fold the fabric again and mark the length of the skirt and the length of the radius: 80cm + 11cm, mark the fold, the center of the circle.
When we put on the first panel, all the points coincide and we just have to cut the fabric, sweep two panels and make a fitting, in our case, on a mannequin.
When we begin to cut the bottom of the skirt in the most oblique part of the fabric, we make a cut 1 cm less than our drawn line passes, why are we doing this? The most vulnerable spot along the oblique will stretch most of all in this place, the bottom line of the skirt will sag more than it should be, which is why you can safely remove one centimeter from the most oblique part and move very smoothly into the desired line.

So, our skirt is tailored and the side seams are swept away, now we need to put the skirt on the mannequin and look at the result.
The question is often asked how and when to align the bottom of the skirt? Only after you have sewn the side seams and processed everything on the overlock and stitched in the zipper, and it is also advisable to sweep the skirt to the belt, only after that you need to put the person on and measure and mark the skirt line from the floor. This can be done with pins, or by drawing a line, this kind of work of aligning the bottom line requires a certain skill.
Sewing the side seams and remember to leave an open section of the seam for stitching in the zipper.
Recommendations for fabrics for skirts sun, half sun - never buy fabrics with stretch. Only fabrics without stretch. Stretch fabrics are hatched on tight skirts. Such a skirt can be sewn from wool, semi-wool, use a checkered fabric, summer version from silk, from sewing, chiffon, the choice is only yours and within the framework of your taste and imagination. This skirt can be sewn lined and unlined, but I do not accept unlined skirts. This skirt will be lined.
There is a very large selection in fabric stores and there are fabrics that stretch in different directions, like rubber, you need to be very careful with such fabrics. It is impossible to get pleasure in work from such fabrics.
Where to start calculating to determine tissue consumption? Our profession requires a certain amount of ingenuity. To calculate the consumption of fabric for a sun skirt, it is recommended to take 4 lengths. If your skirt is short, you need less fabric. For example, with a skirt length of 55 cm, you will need two lengths and two radii. Learn yourself to understand how to calculate the fabric for such a model and at the same time take into account the width of the fabric, since no one will ever tell you exactly how much fabric you need to take, and I will show you the principle of calculating the fabric and I hope that understanding this principle will help you learn by yourself determine the required tissue consumption.
We went through the material: a quarter-sun skirt, a half-sun, a flared skirt with closed darts. If you have interest and desire, I will show you a double or triple sun. Now we are talking about flared skirts, but you should consider this material not only as a skirt of various cuts, but also remember that the skirt can be part of the dress. Get in the habit of considering this material on skirts as part of the dress.
Your top is cut according to the basic system of 10 measurements, the bodice can be of any cut, a sundress or a more closed cut to the waistline, from the waistline down one of three options for a sun skirt (half sun, quarter sun or double or triple sun).
I recommend you the video Dress the sun from haute couture for little money, as well as a video about a one-cut sleeve. Pay attention to the dress I'm wearing, consider that you can already make such a dress for yourself!
Quite often I am asked about the thimble that I use in my work. I want to tell you a few words about him. This thimble made in Japan has a completely unusual design. He can adjust the size and it is convenient to work with him both with fabric and with fur. The thimble is very good because it has a special groove, thanks to which the needle does not slip off and protects the finger well. The thimble can be used even if you have long nails and a good manicure, and at the same time it will not damage your manicure in any way. In addition to its practical application, it has aesthetic, beautiful appearance... Now I have two such thimbles and I will gladly buy more if I find it on sale, since it is quite convenient, beautiful, and affordable, because I bought it in the store at 180 rubles apiece.


 On this I want to end our lesson and wish you all the best, I was with you, Paukshte Irina Mikhailovna!


We grind the belt (with an unstitched cut) to the fitted skirt panels 1 cm from the edge.

We iron the allowances towards the belt.


The new Romanian lei is the national currency of Romania, introduced on July 1, 2005 by exchanging old lei for new ...

Ivan tea is a wonderful alternative to the usual Indian tea. This drink was known to people in our ...

Ivan tea is a wonderful alternative to the usual Indian tea. This drink was known to people in our ...
Capital cannot be understood as something frozen, "as a thing that is at rest." He is in constant motion ...

The capital turnover of a firm is the difference between the current assets that the company owns and its short-term ...

Buying an apartment is a very difficult task for an ordinary person. And it's not even about finding a living space, compiling ...

You probably hear more and more often from friends that they have opened a credit card. It's so great to have ...

The goal of any entrepreneur is to quickly make good profits, he buys goods, spends on advertising, and ...
Which were registered by the IMF after the Second World War. The measure of the ratio of currencies was the official price of gold in ...
Hello dear friends! Answer the question clearly what is a Forex swap and give a clear description ...
A calligrapher is an artist who knows the art of beautiful writing. The profession is suitable for those who are interested in drawing ...

Your brand, company name, will become more recognizable and well-known, which will increase your credibility in the eyes of a potential ...

Advertising of a massage parlor is a task, the optimal solution of which is possible only with the use of a competent ...

Loan processing implies the repayment of the debt in installments over a certain period. Besides the main ...
In my opinion, there is no such person who would not like pickled mushrooms. This is a great appetizer, side dish, and ...

Of course, sympathy can arise out of thin air, but this is more an exception than a pattern. Often, first ...